Pinpoint terminology changes
Pinpoint uses consistent names for spaces, equipment, and visits. This guide connects older labels with the names you now see in Adminland and the check-in flow.
Spaces and equipment
| Previous wording | Current wording | Meaning |
|---|---|---|
| Lab, labs | Space, spaces | A makerspace or other location managed in Pinpoint. |
| Machine type, machine types | Tool, tools | A shared equipment definition and its training requirements. |
| Machine, machines | Tool instance, tool instances | An individual piece of equipment in a space. |
| Tool category | Tool category | A grouping of tool instances within a space. This name is unchanged. |
| Lab admin, lab permissions | Space admin, space permissions | The spaces a person administers. These permissions do not describe their equipment access. |
| Sublab | Subspace | A subdivision of a space, where shown. |
| Badge-machine-type relationships | Badge requirements for tools | The badges required to use a tool. |
These distinctions apply to administration. In the kiosk and regular user experience, individual pieces of equipment are simply called tools. Users do not need to understand the underlying tool/instance model.
A tool should represent the make and model of physical equipment so credentials map to it consistently. For example, Ultimaker S7 is a tool, Ultimaker S7 #1 is a tool instance, and 3D printers could be its tool category. A category helps organize equipment; the tool defines its shared training requirements.
Create or reuse the make/model in Tools, link its credentials in Badge requirements, and add a Tool instance for each physical unit. Multiple instances can use the same shared tool in one space or across spaces that use Pinpoint. Give each instance a name that identifies the physical unit, and select its tool and category.
Use the Tools navigation card for shared definitions and Tool instances for individual units. On an instance form, Tool instance name names the unit, Tool selects its shared definition, and Tool category selects its grouping. The shared-definition screens explain when a change affects other spaces.
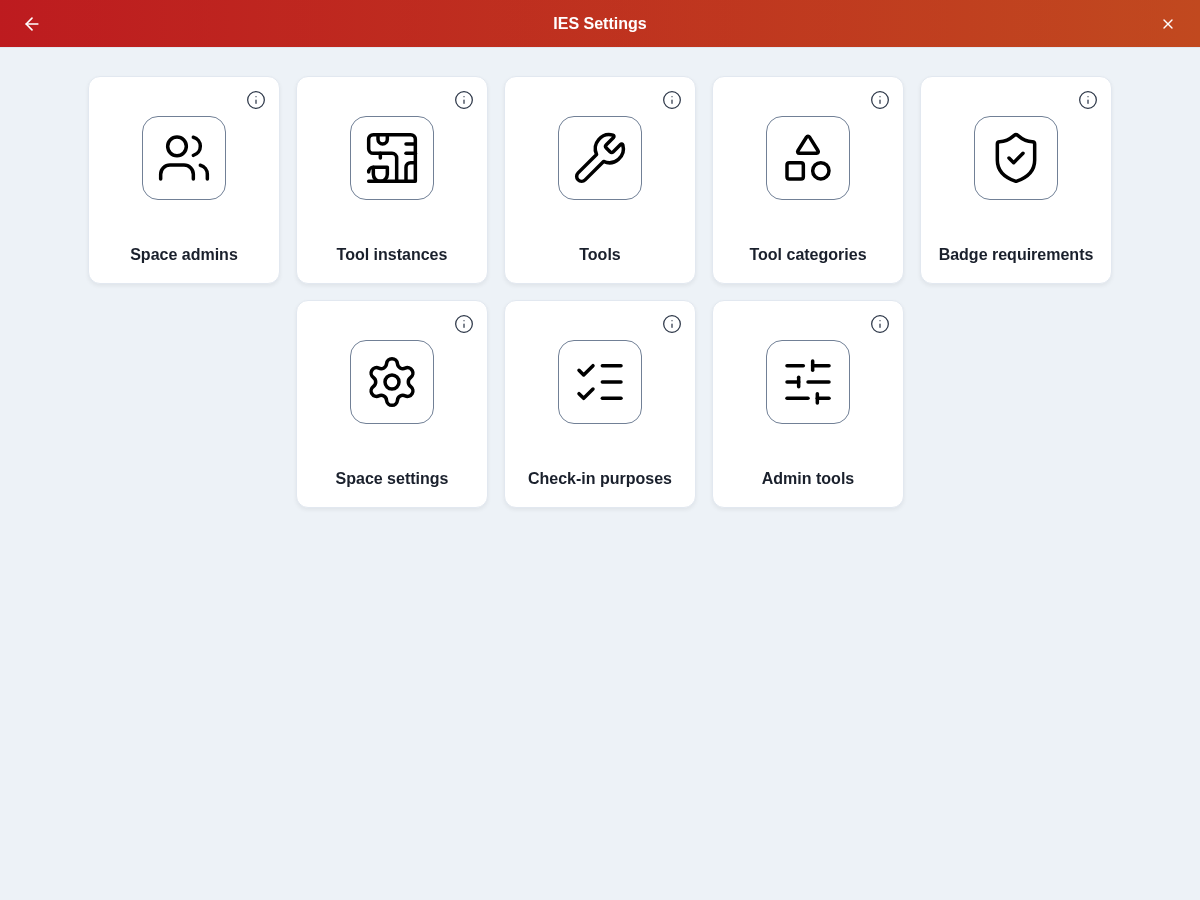
Configured space and equipment names keep their names. A space named “Teaching Lab,” for example, does not need to be renamed.
Visits and tool usage
Pinpoint records visits and the tool instances people select for those visits. Selecting equipment does not book a time slot, hold a tool, or grant exclusive access.
| Previous wording or context | Current wording |
|---|---|
| Reservation, reserved tools | Tool usage, tools in use |
| Reserve Tool(s), at the end of initial check-in | Complete check-in |
| Complete a visit when no tools are available to the user | Complete check-in without tools |
| Reserve New Tool(s), during an existing visit | Update tool usage |
| Save additional equipment during a visit | Save tool usage |
| Leave an existing usage update without changes | Cancel |
| Complete an existing usage update when no tools are selectable | Keep current tool usage |
| Sign in or sign out of a space | Check in or Check out |
| Force logout, log out all visitors | Check out, Check out all |
| Auto logout or force logout in visit records | Automatic checkout, Admin checkout |
With Require tool selection enabled (the default), users must select a tool before completing check-in if at least one in the full catalog is available. When no tools anywhere in the catalog are available to them, the same completion button allows check-in without tools. An empty search or filtered category does not change this rule. Turn Require tool selection off in Space settings to allow check-in without tools even when tools are available.
The footer’s Review selected action shows selected tools together; All tools returns to browsing. Category filters and arrows outside the tool grid help users browse larger catalogs.
The final completion step records the visit and selected tool usage together. Cancel discards an unfinished check-in. Cancelling an update does not end an existing visit.
Kiosk pages use a consistent URL structure: /kiosk/check-in/purpose, /kiosk/check-in/tools, and /kiosk/check-in/complete. Checkout finishes at /kiosk/check-out/complete, and first-time kiosk registration uses /kiosk/register. Existing kiosk links redirect to their current destinations. A URL identifies the step; it does not bypass the required check-in state or complete a visit by itself.
Check-in complete confirms the initial flow; Tool usage saved confirms a later usage update. Updating usage during a visit adds the selected tool instances to that visit. It does not create a booking or replace previous usage.
Account sign-in is still separate: signing in with UMD CAS authenticates an account. Swipe your ID card remains a card instruction. A session is a visit from check-in to checkout, and tool usage history describes equipment recorded during visits. A count of tool usage records is not necessarily a count of visits or people.
Check-in purposes and session duration
Custom reasons is now Check-in purposes. These are the options that explain why someone is visiting the space, such as a class project or a workshop. The kiosk asks for a Check-in purpose; compact visit details use Purpose.
Time Interval is now Session duration. Its help text explains:
The session duration is the typical amount of time someone is visiting the space for this purpose. It is used to record their session end time if they forget to end their session when they leave.
Use Add check-in purpose or the row’s Edit check-in purpose action to open the purpose form. Enter the purpose and set the duration with the Hours and Minutes fields. Create adds a purpose; Save updates it. Cancel leaves the values unchanged. Validation appears after submission, and a failed save keeps the entered values available for correction or retry. This expected visit length is separate from the elapsed duration shown for an actual visit, and it does not reserve equipment.
Each purpose also has two options in the same form, both on by default:
- Enable email reminder: when on, someone who forgets to check out of a visit with this purpose can receive the nightly checkout reminder email. When off, no email is sent for those visits, but the missed checkout still counts toward the person's streak of consecutive missed checkouts.
- Enable time tracking: when on, a visit that is never checked out is closed at its check-in time plus the session duration. When off, the visit has no estimated end, so it is closed at the nightly sweep time instead.
The Check-in purposes table shows each purpose's Email reminder and Time tracking setting as On or Off.
Finding the admin pages
| Previous label | Current label | Use it to… |
|---|---|---|
| Manage Users | Find a user | Search by name, email, UID, or directory ID and open user details. |
| Lab Status, on the live display | Space status | View the live space overview. |
| Space status in Admin tools | Active sessions | See current visits and check people out. A separate Space status display is still available where offered. |
| Swipe Log | Check in log | Review visits, check-in and checkout times, and tool usage. |
| Failed Swipes | Failed check-ins | Investigate unsuccessful check-in attempts. |
| Other settings | Space settings | Configure check-in steps, rename the space, and manage integrations. |
| Machine access | Tool instance access | Inspect access to individual units and their tool requirements. |
The Check in log shows a person's UID and directory ID together when available, in the form UID • directory ID. This helps distinguish people with similar names. In user details, Check-in history contains that person's visit history.
Actions and archived records
Forms use Save for edits, Create space or Create tool instance for creation, and Delete for deletion. Cancel leaves an edit without saving. The Close admin X returns to the main app; the back arrow opens the parent admin page. Admin pages have stable URLs, so browser Back, Forward and reload keep a meaningful destination. Successful actions show a brief confirmation rather than a separate Continue screen.
Lists of tools, tool categories, and check-in purposes now separate Active and Archived records into tabs. Active records appear first. Open Archived to find records you want to restore with Unarchive. An empty active list does not mean archived records have been deleted.
Visit-only check-in
Space settings groups the check-in controls together. Turn off Require tool selection to unlock Skip tool selection, then enable skipping for visits without tool usage. Enabling the requirement turns skipping off and locks it again.
Enable Skip check-in purpose to omit purpose entry as well. Users continue to any remaining enabled step; when neither step needs input, check-in completes automatically. See Space settings for the controls and examples.
Credential requirements and badge connections
Regular users see Additional credential required when a tool needs a credential they cannot currently use. The dialog puts the required credential and any available earning instructions before account connection help. If instructions are missing, users should ask space staff.
To link a credential, super admins choose Add badge requirement, search for a credential by name or ID, and select a tool from the tool catalog. Credential choices show their names with their IDs beneath them. Pinpoint saves the selected records; staff do not need to enter a badge ID or type an exact tool name. If the catalog fails to load, retry. Contact eds@umd.edu if the problem persists.
Super admins can choose Remove badge requirement on a row in Badge requirements for tools. The dialog identifies the badge and tool and explains the effect across spaces. Remove requirement confirms; Cancel leaves it unchanged. Removal deletes only that requirement, not the provider badge or users’ earned badges.
Badge connection controls
Reset badge connection is now Purge badge connection. Super admins see this action for connected users. It opens a confirmation dialog; Purge connection confirms it.
Purging forcibly unlinks all of the user's badge accounts from Pinpoint and removes legacy connection credentials. The user must reconnect from their profile to use tools that require badges. It does not delete badges from their provider account.
The badge API key field and its reveal action have been removed from admin user details. Use the displayed connection status, earned badges, and tool instance access to investigate a problem. See Managing users for the current workflow.
The animation toggle has been removed from the admin UI. Users can still control animations from their profile page.